GET READY TO TAPE
STRETCHING GUIDE &INDICATOR
-
NO STRETCH
-
LIGHT STRETCH
-
MODERATE STRETCH
-
DON’T OVERSTRETCH
TIPS FOR BEST RESULTS
![One](http://www.kttape.com/cdn/shop/files/14-layers_1_200x200.png?v=1685519610)
APPLY BEFORE ACTIVITY
Apply tape one hour before beginning activity for best adhesion.
![Two](http://www.kttape.com/cdn/shop/files/80-layers_200x200.png?v=1685519611)
DON’T RIP OFF!
Gently remove tape from skin, use baby oil if necessary and remove slowly.
![Three](http://www.kttape.com/cdn/shop/files/9-layers_a8c1d6a6-d014-47b3-a7f3-ce041569d6e7_200x200.png?v=1685519611)
TRIM HAIR
Trim excessive hair for better adhesion.
![Four](http://www.kttape.com/cdn/shop/files/14-layers_200x200.png?v=1685519611)
DON’T OVERSTRETCH
Overstretching tape may result in skin irritation and/or abrasions.
![Five](http://www.kttape.com/cdn/shop/files/6-layers_200x200.png?v=1685519611)
CLEAN SKIN
Clean dirt, oils and lotions from area with rubbing alcohol.
![Six](http://www.kttape.com/cdn/shop/files/8-layers_200x200.png?v=1685519611)
END ON SKIN, NOT ON TAPE
Apply directly to skin when possible, especially the ends.
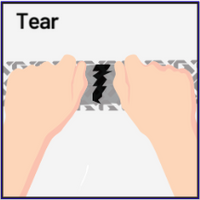
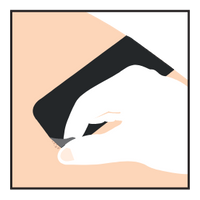
1How to remove paper backing
END
![Remove End Image One](http://www.kttape.com/cdn/shop/files/Screenshot_5_200x200.png?v=1685524165)
Twist and pull to tear paper 2" from the end.
![Remove End Image Two](http://www.kttape.com/cdn/shop/files/Screenshot_4_200x200.png?v=1685524165)
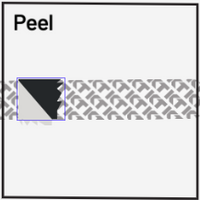
Remove the 2" of paper from end.
MIDDLE
![Remove Middle Image One](http://www.kttape.com/cdn/shop/files/Screenshot_3_200x200.png?v=1685524165)
Twist and pull to tear paper in the center.
![Remove Middle Image Two](http://www.kttape.com/cdn/shop/files/Screenshot_2_200x200.png?v=1685524165)
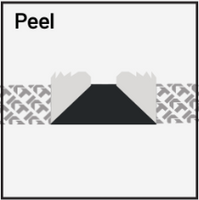
Peel paper leaving 2" of paper on both sides for handling
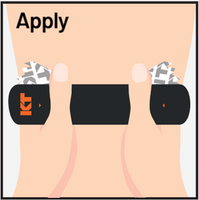
2How to apply tape
END
![Apply Tape Image One](http://www.kttape.com/cdn/shop/files/Screenshot_7_200x200.png?v=1685625540)
![Apply Tape List Image One](http://www.kttape.com/cdn/shop/files/8-layers_4_200x200.png?v=1685522540)
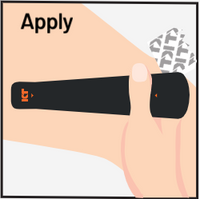
ANCHOR first 2 inches without stretch.
![Apply Tape List Image Two](http://www.kttape.com/cdn/shop/files/9-layers_1_200x200.png?v=1685522540)
Apply stretch according to application
![Apply Tape List Image Three](http://www.kttape.com/cdn/shop/files/5-layers_1e99bc5e-318e-4589-b616-3cf9e010cd17_200x200.png?v=1685522540)
ANCHOR last 2 inches without stretch
![Apply Tape List Image Four](http://www.kttape.com/cdn/shop/files/8-layers_3_200x200.png?v=1685522540)
After applying, rub tape for best adhesion
MIDDLE
![Apply Tape Image Two](http://www.kttape.com/cdn/shop/files/Screenshot_6_200x200.png?v=1685524341)
![Apply Tape List Image One](http://www.kttape.com/cdn/shop/files/10-layers_200x200.png?v=1685522540)
Apply stretch according to application
![Apply Tape List Image Two](http://www.kttape.com/cdn/shop/files/8-layers_2_200x200.png?v=1685522540)
ANCHOR first 2 inches without stretch
![Apply Tape List Image Three](http://www.kttape.com/cdn/shop/files/5-layers_1e99bc5e-318e-4589-b616-3cf9e010cd17_200x200.png?v=1685522540)
ANCHOR last 2 inches without stretch
![Apply Tape List Image Four](http://www.kttape.com/cdn/shop/files/8-layers_3_200x200.png?v=1685522540)
After applying, rub tape for best adhesion
3How to remove tape
![Remove Tape Image One](http://www.kttape.com/cdn/shop/files/757-layers_200x200.png?v=1685523314)
![Remove Tape Image Two](http://www.kttape.com/cdn/shop/files/2017-layers_200x200.png?v=1685523298)
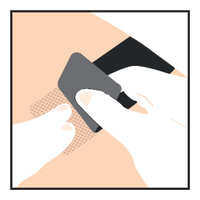
Begin by peeling tape up at a corner. Hold skin down where tape is being pulled off
with one hand while gently pulling tape off with the other hand. Remove slowly.
View General instructions on how to apply KT Tape Learn More